Miles's Second Life Notes
I'll dump my notes for working around the dumb shit that SL makes me go through to make avatars here. They won't be super organized for now. I don't use avastar and I am much more familiar with Blender than SL, so keep my perspective in mind while referencing this

Blender .dae (collada) export settings
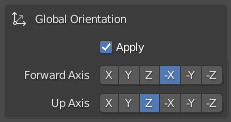
The default preset for exporting .dae files to SL/OpenSim is STILL not correct (as of 2.93). The rest of the Sl+Open Sim Rigged/Static presets are all OK except for this needed change:
Global Orientation:
- -X Forward
- Z Up
- [CHECK] Apply Global Orientation

When you make an avatar, all the bones need to be named correctly, and in the right order for the bone heirarchy; you can't just rearrange the skeleton in whatever way you want. The mHead bone needs to be attached to the mNeck bone, you can't attach mHead to any other bone. You don't *need* to include every bone that SL supports, like the trillions of face bones, or the collision bones (the bones with all-caps names). At the very least, to make a character that you can upload and have it Just Work and able to walk around and use animations, you need this set of bones:

mPelvis is the root bone.
A good way to make an avatar is to download this Bento skeleton .blend file. The skeleton's base bones in the above image can be found in this armature layer (the blue selected one:)

Custom Rigged Attachments With Position Overrides
There are no tutorials about making rigged furry parts wtf
When making a rigged attachment, if there are any bones in the attachment's skeleton that aren't being used and are offset away from the default SL skeleton's bone positions, then they will be saved in the rigged attachment as position overrides for those bones. Example: If you are making a rigged tail, but include the pelvis bone in the tail's armature, if the pelvis bone is moved, then whoever wears the tail will have their pelvis bones offset. I was making a set of rigged furry ears, and after I uploaded it, I noticed in the visible-bones debug view that when I wore them, they would shift every bento face bone. It was because I moved the mFaceRoot bone on accident, and included it in the armature.
I thought that a full skeleton was necessary because I assumed Second Life wouldn't be able to parse an incomplete skeleton that doesn't include everything up to the root pelvis bone. It actually does, and it will treat the origin point of the armature as the next highest parent bone. (If you just have an mTail1 bone in an armature, SL upload will treat the origin as mPelvis)
If you want your tail attachment to use the wearer's avatar-body's tail position, then this is what you have to do:
- Rig a tail to the mTail bones on a second life bento skeleton (download link above). Do not weight anything to the pelvis bone, only the tail bones.
- Delete every bone except the mTail bones and mPelvis (the first unused parent bone)
- Move the pelvis+tail bones TOGETHER where pelvis's root is at the origin 0,0,0.
- Delete the pelvis bone
- Export as rigged .dae and upload
- On the upload dialog, you can preview the skeleton. Check 'Joint Pos. Overrides' for the preview. If you did it correctly, the tail should be in its expected location (not on the floor!)
- The mTail1 bone will be green, along with the rest of the preview skeleton. If you made a longer/shorter/different shaped tail, the mTail2-6 bones should be red. Green = No position override, Red = Position overrode bone
- Make sure you tick 'include joint positions' checkbox in the rigging tab before you upload if you changed the tail bones.
If you want your attachment to have a custom location, like having ears on the top of the head instead of the side, you can just position those bones relative to the origin without worrying about maintaining the offset. For ears, the root will be the mFaceRoot. If you're making generic ears not specially made for a head you can just eyeball it and make your mesh have some leeway for slightly larger/smaller heads
Exporting animation/poses from Blender
- Have your first keyframe be the T-Pose of the armature
- Make the rest of your animation
- Before exporting, rotate the armature -90 degrees on the X axis in object mode so it would look like it's lying down, facing up (+Z-forward, +Y-up), and apply transforms
- Export as .bvh, and make sure the "Root Translation Only" option is checked in the export window
Important notes about animations:
- Bento bones do not have any default SL animations like the rest of the body does. So, after playing a bento animation, the bones will not return to its neutral pose, they will be stuck in whatever the last pose of the animation was. To avoid this, you need to have your avatar play a 0-priority animation with the bento bones in their nuetral pose.
My Random Tips Of Second Life Knowledge
This stuff took me frustratingly long to figure out because info on SL dev is scattered and/or not beginner friendly. Here's my random tips for people who want to make avatars.
- Be familiar with Blender first before trying to learn how to make avatars. Trying to learn SL's bullshit along with Blender at the same time would make me embalm myself. It helps a lot when debugging if you know which program is having the problem.
- This link has downloads to the skeletons.
- This link has some helpful information regarding the skeleton. It's made by the creator of Avastar, which is a paid Blender plugin which makes managing avatars easier. I do not use it, so the information on this page will not apply to Avastar development.
- Bento bones do not animate if you don't have a animation that uses them. The rest of the skeleton uses the set of default SL animations.
- Bones that don't have any vertex groups associated with them (the mesh will be magenta in weight paint mode) will be ignored by the SL importer, and so all the bones' children will be offset by the default skeleton instead of your custom one. This includes bones that aren't meant to be animated like mFaceRoot.
- Just straight up ask for help from people you know who develop. Be polite and specific with questions.
Random issues I solved
- Weird normal issue: The model looked fine in an A-pose in Blender, but had some weird normals artifacting in-game in the same pose. I solve it here by data-transfering normals from a pre-A-posed version of the same model before uploading.
Back to top